2020/08/09

Gwen Lafleur mixed media class part2

 Hi everyone, The coronavirus continues to spread throughout the world, even in here Japan. How are you? Hope you are safe and well. There are many different online classes in the craft world, and I took a class with Gwen Lafleur and Seth Apter. They give me pleasure. Today I'm posting Gwen's class No. 2, which is a continuation of the previous one! 

Mixed Media Menagerie....The theme of this class is to create our own whimsical Menagerie in our accordion book. It was very fun and my favorite subject, but creating whimsical animals were a bit difficult. I've made two books so far, but I have to make place for few more animals which still has no place.

The first book.

The last page is transparent acetate with a floral printed pocket.

The second book.
He in the acetate pocket.
Gwen has given two free Facebook online classes so far, and the next post will feature my work.

Thank you so much for dropping.
Take care and stay safe.
Etsuko xxx


Gwen's Mixed Media art class

Recently I took Gwen's several online class, Her classes are very fun and very motivating as I  learn different techniques step by step. And her samples are very inspiring. The most benefit is that we are given a PDF template (shape of the plants or organisms) to create our work. It's easy to start and as I'm making it, I'll find my path. These are the works I made in Gwen's class. 
You can see Gwen's free classes by signing in to Gwen Lafleur - Mixed Media & Creative Community on Facebook.

From Cut Paper Collage May 16th 2020. All from Gwen's template, except for the octopus and butterfly.


STICK, STAMP, PAINT. June 6th 2020. Using stamps EGL01, EGL03, EGL05 and EGL06. This class was a little difficult to structure after the collage. I'll try again soon!!


Thank you so much for visiting, I will post the next lesson soon.
Take care and stay safe and well.
Etsuko xxx

2020/07/19

Inner Beauty by PaperArtsy Blog

Hi everyone. Tonight I'd like share with you PaperArtsy blog #14 Topic typography using France Papillon's beautiful stamp set. I did a technique in which letters are gathered together to make the word NATURE. 
Please visit the PaperArtsy blog for more photos and techniques!


Thank you so much dropping by.
Etsuko xxx

2020/06/07

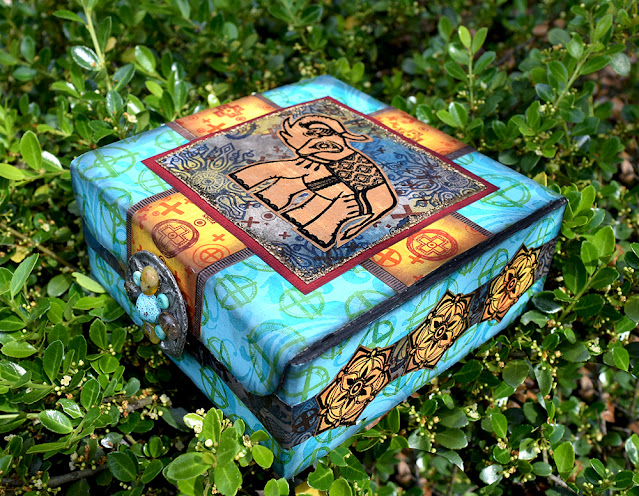
Indian Box post on PaperArtsy Blog

Hi everyone. Now corona pandemic is a difficult time, hope you are fine and have fun crafting.
Tonight I want shared with you PaperArtsy project 'Indian Box' using Gwen's stamps This PaperArtsy Topic is Recycled package, I was using small cardboard boxes.


I using Gwen's stamps are EGL01EGL03EGL06(New), EGL07(New).


First I made box's master board papers and elephant for focal point. And both side embellishments. 


The attached them.


I also decorated the back of the lid as I wanted something.

Finally I made three types clasp  by solder, as you can see, the dent was shallow, so I chose on the left round shape to make the clasp, the cabochon by embossing powder and these gemstones was glued to the solder clasp.

This is the finished box.
Thank you so much for visiting by.
Take care and stay safe and have a happy crafting all!!
Etsuko xxx


2020/02/26

PaperArtsy #3 Topic Mighty Mica to my project.

Hi everyone.
We are in the final chapter of winter, where the sun is warming day by day and the fairies are in a good climate to play. Today I made such a scene of the hanging wall. This blog have posted on PaperArtsy Blog which you can see Here.


This time, PaperArtsy's theme was Mighty Mica, so I mainly used colors mica powder and pearl mica flake for the background.
Unfortunately these photos do not show the mica's satisfactory glow.


This topic used Lin Brown's fabulous stamps ( ELB023, ELB028) and stencils ( PS001).
Thank you so much for taking the time to stop by.
Have a wonderful day.
Etsuko xxx

2020/02/17

My project PaperArtsy Topic# 3 "On This Tag'

Hi everyone.
Here in Japan this winter was warm and this week was like spring, but from tomorrow it will snow and get cold.
Now tonight, I'd like share with my project 'Funky Guys' of the PaperArty Blog Topic # 3 On This Tag, please visit there.
I made several tags using Elena's (Elena ZinskiArt) lovely new mini stamps and Alison's (Words and Pictures) quote stamps.


And more different one.


Thank you so much for stopping by and hope you like them. 
Etsuko xxx

2019/12/10

PaperArtsy Blog Topic 'A Bit Sparkle ' my project 'Shaker Shrine’ ornament


Hi everyone,  I'd like to share with you PaperArtsy Blog Topic 'A Bit Sparkle ' and  this is my project 'Shaker ornament' with Ink The Dog's stamp on this fortnight topic 'A Bit Sparkle'.

Nearly a year ago, Stephanie Jones Rubiano's online workshop for printing shrink plastic and making a diorama at the shrine was very fresh and fun, so I wanted to share it on this project.
How to make this shrine is explained in detail on the Stephanie site Freebies video.


I have prepared three types of shrines made of MDF: scalloped circle, scalloped oval and heart. Although it is not shown here, it contains each clear acrylic of the same shape for these windows. 

First I stamped each images on a Smoothy A4 white card and
colored then scan it to PC. Next print the images on a white matte A4 shrink plastic. When printing on shrink plastic, the original image will be darker, so set the opacity to 75-50% and make the color a little light before printing. The shrinkage of the plastic is about 50%, and adjust the original image accordingly. Wait until the printed image dries well, cut it with scissors, put it in the oven toaster, and when the shape has shrunk, take it out and apply a little pressure with a tile on a flat surface.


These papers are used for the background and the back of the shrine. I used these colors are Caribbean Sea, Granny Smith, Eggplant Fresco paints and some Distress Oxide and white embossing powder on the smoothy regular A4 white card. And stamps are EM48, MN61, HP1006.


The side and inner layers are seen at the completion of the scalloped circle shrine. The boy's hat and clothes were drawn with colored pencils on the shrink plastic after printing. The MDF in the middle is slightly protruding to receive the acrylic window and I painted it so that the blue color was visible. The outer burnt color remains the same as when purchased, I added silver Dresden Trim. The top scallop circle was painted silver and added with rhinestones. I prepared various materials for the shaker, but for example, mica, glass glitter, sequins, beads, etc., and the good was beads that were not stuck on acrylic window. This size is 2.75”(7cm) circle, 0.6”(1.5cm) depth.


I painted silver color on the top of the scalloped circle and added rhinestones.
, shaker is silver beads.


Stamps used for the background and shrink plastics. EM48, WW4.


On the back of the shrine, I used the same paper as the background, stamped the WW4 script by Distress Oxide Vintage Photo, and embossed Alison's new EAB14 quote on black paper.


I used Glass Blue and Caribbean Sea for the scalloped oval at the top and a golden Dresden Trim on the side. The MDF in the middle parts is gold.
Size is 3.14” (8cm) height, 2.55” (6.5cm) width, 0.6”(1.5cm) depth.


From the front and hologram beads.


Stamp used for shrink plastic-HP1604EZ・HP1506EZ.


The backside, I used Alison's new quote stamp 'Happiness' EAB14.


Heart-shaped ornament, gold leaf on part of the side.
Size is 2.55” (6.5cm) height, 2.75” (7cm) width, 0.6”(1.5cm) depth.


Stamped with MN75 by Jet Black Archival on the smooth white card, cut into heart shapes and stuck it on the top MDF and the gold stars shrink plastic
was added to it. Pearl colored beads are inside.


Stamps used for these plastic-WW5, HP1506EZ and the crown LPC007.


On the back of the shrine I added Alison's new EAB14 quote.


A code was added so that each ornament could be hung on a wall or tree.


This is the last topic this year, and I'm really happy to have a really good time for a year. I'm always happy to be able to do what I want to do while crafting every day,
and I'm constantly struggling with things that don't go well. I always think I can do what I like someday.
Finally thank you for these great idea and fun Stephanie.
Have a great week and Merry Christmas and A Happy New Year to everyone.
Thank you so much for visiting.
Etsuko xxx