Hello everybody, Today I have challenged to PaperArtsy blog challenge, that theme is Tissue Paper which you can see here. I made this using Leandra's technique when I started craft. And I remembered that I was very excited her demo.
First I stamped Darcy 's stamps on tissue paper, painted from the back and all covered with Snow Flake on it, so that the background could not be seen through.
I ripped the stamped edge of the tissue paper with water and pasted with matt gel onto the ATCoins. It was unsatisfied. with only three coins so I made a background using Grunge Paste and Fresco Paint on 10 Tag and pasted these coins.
Hi everyone, Today, and I'd like to share with you PaperArtsy my Shift project using Stamp Platform with Courtney's favorite stamps.
It was so exiting when Tim Holtz first introduced the Stamp Platform on Youtube, and before that I used a T-shaped tool for positioning but I could not do a variety of work like this. I am using it for most work now. Also I am very happy that Lynne Perrella's delicate stamps and stamps can be cleanly stamped without fail.
First I wanted to use it for positioning, so I set the quilting section sheet down to the Platform.
To use it stamp directly on the sheet, set the paper under it, remove the sheet and stamp it on the paper.
Next is a method of shifting the stamp and making a shadow. Here I move the paper with the position of the stamp intact, first stamp the orange shadow, move the paper to the upper left, change the color to brown and stamp. To make a shadow of the same width, move the stamp and the paper repeats the shift at the same position as shown above.
I used Halloween stamps by Hot Picks HPHW02 https://shop.paperartsy.co.uk/hot-pick---halloween-02-3751-p.asp
I used these Fresco Finishs -- Twilight, Double Denim, Venice Blue, Steel Gray, Glacier Ice.
These are very cool blue colours.
This is a continuous pattern of the same interval. Make a measuring tape that calculates the pattern and spacing, while moving the paper by each one graduation line then repeat stamp on the paper.
This is a process of making the stamp fixed and pink heart. It is a simple technique, but it is difficult to stamp many times in the same place.
The background was darker than pink, so firstly I used white and pink on it, added a little distress and finished with Seth's bee wax baked texture.
I was very enjoy this project wth Courtney's images, Stamp Platform is very convenient tool and I think that it is an innovation in the recent craft party. I think there are still techniques to use this tool as much as possible. I am looking forward to seeing everybody blog challenge.
Hi everyone, today I'd like to share with you Artist Trading coins by Sara Nawmann's stamps that PaperArtsy challenge blog which you can see here. Lovely Sara new stamps are very abstract images and I collaged graphical designs for these coins.
First I've used images from the Sara Naumann's new stamp set ESN26,
and ESN27 set.
Also I've used new Fresco Paints. Koala, Peach Nectar, Surf's Up, Pine Grove, Twilight.
and Chalk.
I made three masterboards with a new Fresco Paints and Chalk and Sara's new stamps for backgrounds.
I using Peach Nectar, Surf's Up, Koala Chalk Fresco and Grunge Paste and Sara's new stamp set ESN27.
Randomly brayered with Koala and Chalk Fresco.
Stenciled Sara's PS090 with Peach Nectar and brayered with Twilight.
I made embellishments to use for collage and made it texture with glossy Accents and Glass Beads Gel. Small stamps are made and used like this when there is time.
I've used ESN26, ESN27 new image and lovely heart from ESN11.
Yellow star from ESN13 colours are Lavender + Eggplant, Limelight and Bougainvillea Fresco. Although it does not have to trim but I add if there are many white parts on the card.
Layers colours are Twilight, Peach Nectar and Pine Grove.
When the focal point decided for each coin, I collaged those embellishments. Here I placed 6 type layout coins, but you can make various coins by changing layers and colors.
The collage making images is very fun, but making it in a circle has another interesting. This is going to be an addiction. Why do not you everyone make it? I'm looking forward to seeing your wonderful coins!! Have a fun!!
Hello everybody I've made second piece by Seth's stamps.
This time I want to make background with PA Fresco paints and flowed Seth's tutorial. I made three background sheets and I used two pieces here. The central background I based a dark color and roughly painted an opaque thin color on the base then stamped color close to white. This is the background of the first piece.
I stamped the image of Seth on that background and collaged several pieces and used UTEE on it. Then I used Baked Textures as an antique monocle for the focal point and made rust and stuck it. Finally I pointed 'possible' from book piece.
I'll continue this work. Thank you so much for stopping by, see you soon!!
Hello everybody, I've played Seth Apter's Stamps and Baked Textures.
These stamps are a prize of PA Challenge, I'm very lucky. I tried using them with Baked Textures. At first the background did not go well and almost gave up and finally I got it. After that the layer from Seth's stamp was going smoothly.
This is what I made.
I made rust by using Baked Textures -- Chunky Rust, Rocky Road, Patina Oxide as a keyhole stamp. It seems really rust!!
I use Deep Sea for this character it is beautiful with three-dimensional and glossy.
Seth's stamp set can be variously combined and I will making again. Thank you so much for stopping by, see you soon!!
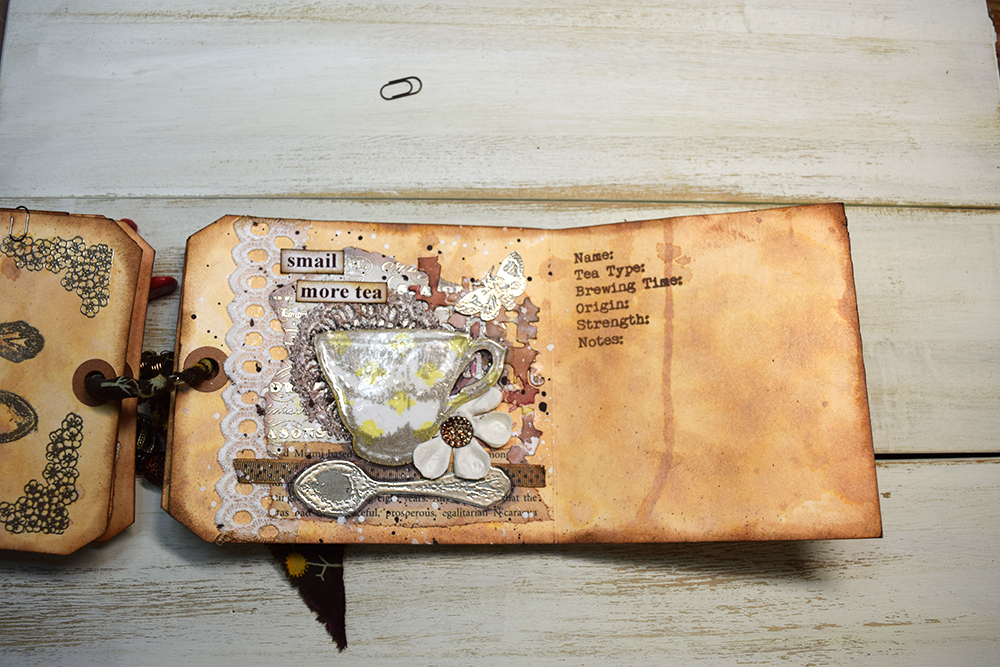
Hi everyone, Today I’d like to share with you ’Tag Tea Book’. Although we usually use a fixed shop or tea brand for green tea, but I buy various brands of black tea.
So I decided to create Tea Book and Baked Textures of the theme using a new Beautiful Raquel' stamps and stencils.
And I made the texture of pottery with embossed powder as she had done to Raquel 's fabulous tea cup stamps.
This book used 10 Tags and every tags was distressed with Vintage Photo Oxide.
First I used embossing powder Gold for ESC 09 frame, ESC 16 quote and tea branch and made a front cover, also I used clear powder twice on the quote.
First pages, paste the tea bag who drunk at that time. The background I used grange paste on the stenciled PS106 by Vintage Photo Distress Ink.
Where opened the tea bag page, I layered many leftover and put on the ESC 15 teacup for the focal point. Teacup : I panted Vintage Lace Fresco and stenciled PS106 by Peach Nectar Fresco then I used Esc15 teacup by gold embossing powder. When teacup and tea flower dried I used clear embossing powder twice. Next I stamped Esc15 tea details in the margin by Vintage Photo Ink.
Second pages are almost the same as first.
Used Esc16 tea branch, tea names and PS108 stencil.
The ESC16 teacup and flowers corner embossed by gold powder on the painted Pine Grove and Snow paper, after fussy cut I embossed clear powder twice too.
I embossed Esc16 stamps tea flowers, spoons and words' by Princess gold on the left page. I stenciled PS108 by Grange Paste on the teabag background. Stamps used for facing page : teacup, spoon and butterfly, ESC16, ESC04.
Last Pages : Stamps--ESC16, Esc15 Stencil--PS107
The back cover embossed tea branch and crown by gold powder.
Finally I made the ring with fabric piece and some beads.
Raquel's new releases are absolutely beautiful and flexible, I enjoyed making very happy. Thank you so much for stopping by, see you soon!!
Hi friends Today I'd like to share with you Seth's fabulous Baked Textures using Raquel's beautiful new release. on PaperArtsy challenge blog which you can see Here.
I wanted to use his powder which can make grunge techniques since Seth announced this texture.
previous powder so far is almost matte, I did not use it much for the work of mixed media.
This powder melts into the surroundings and creates an interesting texture so it is a lot of fun. I have not done a lot of experiments yet, but please enjoy it.
First decided to make a little panel with Raquel's new stamps and stencil. In the background I made pieces using some Baked Textures and collaged it.Photo Frame and Teacup at Focal Point.
What looks black is Rocky Road - Transparent, uneven and very glossy. Dirty Sand on the black dark tape on the right and on the brown paper below it is Ancient Amber. Stamps are ESA09 set.
I made Baked Texture Skins, although his film was smooth, but my film was many holes. (Left of the photo)
The photo frame I used Raquel PS106 stencil with Ancient Amber. Since it cooled down I used Vintage Beewax once on it. And finally I used Rocky Road at the edge.
Beautiful Raquel tea cup Esc15, I tried to use Baked Textures but I could not make delicate lines and when I used Vintage Beeswax on top it got blurred.---That was my choice wrong.
I used Twilight Fresco on the base and stamped by some gold embossing powder and clear powder.
I was a lot of fun to play with this powder, and Raquel's beautiful Tea Time series has plentiful stamps and stencils that can make a variety of works.
Baked Textureshas a lot of possibilities and it is interesting to devise it, Please everybody try this challenge, I'm looking forward to seeing it!!